My tank came with two different size bungs, a 3/8" and a smaller 1/4" bung which I wished it came with none and I could have installed my own.

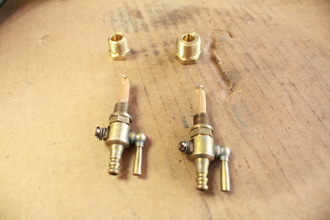
The picture shows the bushings on the petcocks ready for installation on the tank.
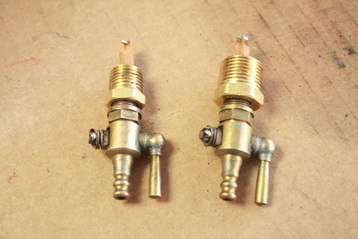
 I ordered a couple petcocks for my gas tank. Each carburetor will have its own dedicated fuel petcock. I was able to find two beautiful brass petcocks. They are vintage fuel petcocks off either a BSA or Triumph, probably from the 50's-70's era. My tank came with two different size bungs, a 3/8" and a smaller 1/4" bung which I wished it came with none and I could have installed my own.  So to solve the problem I went to my local Ace Hardware and picked up a couple hex bushings the reduced both the 3/8" NPT and 1/4" NPT bungs to the 1/8" NPT threads on the petcocks. The picture shows the bushings on the petcocks ready for installation on the tank.
0 Comments
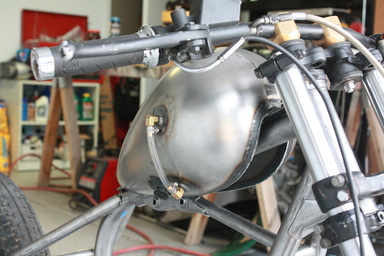
 After the Visual Fuel gauge was installed. I apologize for not getting pictures of the progress and only showing the finished product. Since my bike will have the old school look that means no speedometer**, gas gauge or anything. Basically everything will be stripped except the wiring to run it, start it, and keep it legal; i.e. headlight and break light. We can argue safety later. I rode a GREEN crotch rocket that was never seen. This bike will be heard far before it is seen. Anyways I digress, a really cool feature is to have a 'visial' gas gauge. The steps was to order a couple NPT threaded bungs that I got from Bung King. Then some brass angles and clear tubing from the local hardware store. The total cost was at $16, much cheaper than a $36 kit.  The next goal was getting the tank mounted. Many guys out there just drill & tap the backbone tube. There were a couple reasons I would not go that route.
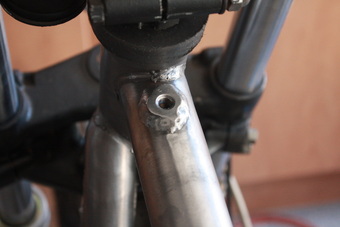
I felt the only option was the option my dad believed in as he would say, "Nothing should be done half a$$ or mickey mouse!" To over come the strength issues of losing integrity I got some blind bungs, meaning the bungs did not have a whole all the way through. I chose these because that way water could not enter the bung through the threads and get inside the frame. Here are the bungs I used, I used metric threads to match the metric bike. To overcome the sencond concern, I went down to the local hardware store and found some perfect grommets ans some stainless button hex bolts as seen in the pictures. **Actually I will use an Android phone or iPhone as my speedometer with an app, I will create old school brass holder for the phone and wire in a charging unit so that I can have a waterproof USB charging port on the bike, but it will be hidden. Not having a speedo is legal, safe, and fine. I can gauge my speed based on other vehicles.
So the 4" inch solid brass risers were obnoxious being so tall, however they go for about $250 new, maybe I could rebuild them to remove the 3" riser perches to be the right height so that I could keep the brass look. I love the old school brass, remember, there ain't no school like the old school. So here are the risers as stock height, beautiful. I may polish them, we will see. Finally my Single Cap Alien Gas Tank arrived from Cycle X. I got it cheaper tahn anyone else had it while everyone else had it on backorder. I think the tank is perfect. It is an alien peanut tank from the 60's and 70's. I will get a brass cap for it as well. So now the bad news. After I tried to put on the new front wheel I bought I realized it in no way fit, the width was off, the axle was wrong, etc, etc. I called up my buddy who I bought the bike from, he told me he believed it was all stock. After closer inspection i Saw Suzuki's little 'S' on all the bolts on the rotor and rim. Also, after a little more research I realized the whole front end except the triple trees were from the wrong bike, a Suzuki GS450. I also realized they were longer which meant a lot of the mockup welding that I had done was wrong as well. As you will see in the pics I had to put ratchet tie downs on the front end to compress the forks to get the right angles. Alright, so this week I received a bunch of parts and here they are. Got in my rear Harley Davidson disc to go with my HD wheel that should be here later this next week. I ordered this rotor along with my rear tire and wheel on eBay from American Classic Motors. That have some of the best prices online!!! I had to order a custom rear sprocket that would have the low number of teeth for the gearing on the Japanese bike but bolt pattern and 2" spacer for the Harley Davidson wheel. Rebel Gears is great, they got me a custom 33 teeth sprocket instead of 34T that comes stock. They can make any custom sprocket and were very fast. Typically when you convert a soft tail bike to a hard tail there is issues with the chain slack. After the chain stretches it can slap the bottom rail or your tire. To remedy this guys have been installing chain tensioners that can be spring loaded to comepnsate over time for the chain stretch. How cool was it to go old school to my younger years and roll with a Powell Peralta skateboard wheel as a tensioner! I picked this up at Lowbrow Customs, check 'em out. Good guys and good gear! I also got in my tractor leaf spring that will be converted to a seat spring to make the seat float in the air, fingers crossed. This particular spring is a 1000lb. spring so I should be fine. Actually I will remove the smaller third leaf which will accomodate anyone from 100lb to about 300lb. The lower picture shows the eyes cut off. I am hoping I can halve the spring and sale the second as a full leaf spring kit. I may have to cut past the half way mark making the leftover useless. Also I received one of the best looking parts on this bike, the sexy Single Cap Alien Gas Tank arrived from Cycle X. I got a sweet deal on it and it looks perfect on my scoot. Need to figure out the valve and petcock if any fab'ing is in order. Hopefully it will all work. Also thinking about an external gas gauge...
I will also be picking up a brass cap for it as well. There was a lot of bondo on the bike to blend everything... I mean everything. I can't find one weld or seem between a larger tube and smaller tube because everything was bondo'ed, ugh. Also, layers of paint. I tried sandblasting it at home in my garage with my sandbalster and it wasn't having it. I first tried Walnut shell, nothing, then silica sand, not much better.
Then I started hunting down chemical strippers. Found Xpress Stripping, LLC in Phoenix, AZ. These guys were great, husband/wife and son combo. $60 for the frame, $20 for the tank, and $15 for what was left of the fender after hacking it off. I started realizing it more and more that I was growing separate from this frame. The flames weren't doing it for me, it had about a 6" stretch and I was really wanting that shorter bobber look with either a 0" or 1" stretch. Also, the flames I was not digging, guess it isn't my thing. Also, I knew I could part with this frame for about the price I had in the whole roller. I had done a lot of new work to it and really cleaned it up and had it stripped. The hunt begins... stay tuned. |
YAMAHA
|